Account Setup: Snowflake
Depot’s Snowflake Location has some prerequisites. This page details what you need to configure in order to use Snowflake as a Depot Snowflake Location.
Snowflake Location Credentials
A Snowflake Location defined in CDK for Depot typically looks like this:
const snowflakeLocation = new depot.Location.Snowflake(this, "Snowflake", {
  accountId: "AB12345",
  credentialsSecretArn: "arn:aws:secretsmanager:eu-west-1:123456789012:secret:my-credentials-O72rNM",
  environment: depotEnvironment,
  warehouse: "MY_WAREHOUSE_NAME",
  region: "eu-west-1",
  roleArn: "unused"
});
Notice the credentialsSecretArn that is referenced. This AWS Secrets Manager secret stores credentials for the Depot Location to access Snowflake for Transactions and Data queries. The secret should contain 3 x fields:
usernamepasswordprivatekey
- First of all you need a Snowflake user account. The user should not have MFA enabled, otherwise you’ll need to approve MFA requests every time your application writes to or reads from Snowflake.
- You need to create a public / private keypair and assign the public key to your chosen Snowflake user account.
Snowflake privilege requirement: ACCOUNTADMIN
SQL to create a new Snowflake user:
CREATE USER EXAMPLEUSER PASSWORD = 'SomeSecurePasswordHere' LOGIN_NAME = 'EXAMPLEUSER' DISPLAY_NAME = 'Example 1' FIRST_NAME = 'Example' LAST_NAME = 'User' EMAIL = 'example@example.com' DEFAULT_ROLE = "SYSADMIN" MUST_CHANGE_PASSWORD = FALSE;
Generate the public and private keys:
openssl genrsa 2048 | openssl pkcs8 -topk8 -inform PEM -out snowflake_wsdemo1_rsa_key.p8 -nocrypt
openssl rsa -in snowflake_wsdemo1_rsa_key.p8 -pubout -out snowflake_wsdemo1_rsa_key.pub
Assign the public key to the Snowflake user (you’ll need to format your public key into a single-line string:
ALTER USER EXAMPLEUSER SET RSA_PUBLIC_KEY='PUBLIC_KEY_AS_SINGLE_LINE_STRING_GOES_HERE';
Create a dedicated Role and assign it to the new user:
CREATE ROLE EXAMPLE_ROLE;
GRANT ROLE EXAMPLE_ROLE TO USER EXAMPLEUSER;
Note: in future we may remove the password field being required in the above Secret, as a user authenticating with a private key does not need a password.
Create Snowflake Database
This step assumes you are not using the createEntities flag for your Depot Dataset (which would otherwise automatically create a Snowflake Database for you).
Snowflake privilege requirement: SYSADMIN
Create a Snowflake Database that your Depot Snowflake Location will use:
CREATE DATABASE EXAMPLE_DB;
Grant permissions on the EXAMPLE_DB database and PUBLIC schema to your Role:
GRANT CREATE SCHEMA, MODIFY, MONITOR, REFERENCE_USAGE, USAGE ON DATABASE EXAMPLE_DB TO ROLE WS_EXAMPLE_ROLE;
GRANT ADD SEARCH OPTIMIZATION, CREATE EXTERNAL TABLE, CREATE FUNCTION, CREATE MASKING POLICY, CREATE MATERIALIZED VIEW, CREATE PIPE, CREATE PROCEDURE, CREATE ROW ACCESS POLICY, CREATE SEQUENCE, CREATE SESSION POLICY, CREATE STAGE, CREATE STREAM, CREATE TABLE, CREATE TAG, CREATE TASK, CREATE TEMPORARY TABLE, CREATE VIEW, MODIFY, MONITOR, USAGE ON SCHEMA "EXAMPLE_DB"."PUBLIC" TO ROLE EXAMPLE_ROLE;
A note on database naming
For the Database name, this should follow the convention of of {ENVIRONMENTNAME}_{DATASET_NAME_OR_ID} (all in UPPER_SNAKE_CASE)
Example
For an Environment named dev and a dataset with name or alias example.work the resulting Snowflake Database would be called: DEV_EXAMPLE_WORK. (Everything is uppercased and dots are replaced with underscores).
Also to note: if sqlDatabaseOverride is specified for a Dataset in your Depot CDK project, then the database name when the Depot API connects to Snowflake will instead use that (uppercased). If this is the scenario you are using, then be sure to instead name your Snowflake Database to match this override name.
Create Snowflake S3 Storage Integration and IAM Configuration
This step assumes you are not using the createEntities flag for your Depot Dataset (which would otherwise automatically create the S3 Storage Integration for you). This requires your Snowflake executing role to be granted the global CREATE INTEGRATION privilege.
Snowflake privilege requirement: SYSADMIN, or role granted global CREATE INTEGRATION
AWS IAM Setup
Setup an IAM Policy in your AWS account that the Snowflake user will use to access S3:
- Create a new IAM policy that gives access to the specific S3 bucket / location that will be used for incoming data. Policy example below (lock down further with Conditions as required):
{
    "Version": "2012-10-17",
    "Statement": [
        {
            "Effect": "Allow",
            "Action": [
                "s3:PutObject",
                "s3:GetObject",
                "s3:GetObjectVersion",
                "s3:DeleteObject",
                "s3:DeleteObjectVersion"
            ],
            "Resource": "arn:aws:s3:::example-snowflake-test-data/*"
        },
        {
            "Effect": "Allow",
            "Action": ["s3:ListBucket", "s3:GetBucketLocation"],
            "Resource": "arn:aws:s3:::example-snowflake-test-data",
            "Condition": {
                "StringLike": {
                    "s3:prefix": [
                        "*"
                    ]
                }
            }
        }
    ]
}
Setting the "s3:prefix": condition to either ["*"] or ["<path>/*"] grants access
to all prefixes in the specified bucket or path in the bucket, respectively.
- Create a new IAM Role. When creating the Role configure it as follows:
- Select Another AWS account as the trusted entity type.
- In the Account ID field, enter your own AWS account ID temporarily. Later, you will modify the trusted relationshipand grant access to Snowflake.
- Select the Require external ID option. Enter a dummy ID such as 0000. Later, you will modify the trustedrelationship and specify the external ID for your Snowflake stage. An external ID is required to grant access toyour AWS resources (i.e. S3) to a third party (i.e. Snowflake).
- Click the Next button.
- Locate the IAM Policy you created earlier and select this policy to attach to the new Role.
- Click the Next button, give the Role a suitable name and description, and finish creating it.
- Note down the Role ARN of the created Role.
You will need to come back to this Role and edit the trusted entities and conditions once you have created the Snowflake Storage Integration below.
If you are using Snowflake as a secondary Depot Storage location, then you will need to add to this IAM role’s policy to allow read/write access to your Depot environment’s data bucket. This bucket is always named with the format: {sdp-<env id>-data} Example updated policy listed below:
{
    "Version": "2012-10-17",
    "Statement": [
        {
            "Effect": "Allow",
            "Action": [
                "s3:PutObject",
                "s3:GetObject",
                "s3:GetObjectVersion",
                "s3:DeleteObject",
                "s3:DeleteObjectVersion"
            ],
            "Resource": [
                "arn:aws:s3:::bucket-example-depot/*",
                "arn:aws:s3:::sdp-envid-data/*"
            ]
        },
        {
            "Effect": "Allow",
            "Action": [
                "s3:ListBucket",
                "s3:GetBucketLocation"
            ],
            "Resource": [
                "arn:aws:s3:::bucket-example-depot",
                "arn:aws:s3:::sdp-envid-data"
            ],
            "Condition": {
                "StringLike": {
                    "s3:prefix": [
                        "*"
                    ]
                }
            }
        }
    ]
}
Snowflake Storage Integration Setup
Next you will configure a new Storage Integration.
Make sure you replace the STORAGE_AWS_ROLE_ARN and STORAGE_ALLOWED_LOCATIONS in the SQL example below with the appropriate values for your integration.
CREATE STORAGE INTEGRATION WS_EXAMPLE_STORAGE_INT
TYPE = EXTERNAL_STAGE
STORAGE_PROVIDER = S3
ENABLED = TRUE
STORAGE_AWS_ROLE_ARN = 'arn:aws:iam::123456789012:role/example-snowflake-access'
STORAGE_AWS_OBJECT_ACL = 'bucket-owner-full-control'
STORAGE_ALLOWED_LOCATIONS = ('s3://example-test-data/', 's3://example-test-data');
Grant ownership to your Role, and usage on the Storage Integration to your Role:
GRANT OWNERSHIP ON INTEGRATION EXAMPLE_STORAGE_INT TO ROLE EXAMPLE_ROLE;
GRANT USAGE ON INTEGRATION EXAMPLE_STORAGE_INT TO ROLE EXAMPLE_ROLE;
Additional external stages that also use this integration can reference the allowed buckets and paths. The URL in the Stage definition must align with the S3 buckets (and optional paths) specified for the STORAGE_ALLOWED_LOCATIONS parameter.
Next, describe the new Storage Integration to retrieve Snowflake AWS Account details:
DESC INTEGRATION EXAMPLE_STORAGE_INT;
The query results will show various values, but take note specfically of:
STORAGE_AWS_IAM_USER_ARNand it’s value such as: arn:aws:iam::123456789012:user/97k5-s-iest5347-STORAGE_AWS_EXTERNAL_IDand it's value such as: AB12345_SFCRole=3_+t8v/JZXcBOKL6tQFaorPfPTeW8=
Go back and edit your IAM Role. Modify the Trusted Entities and Conditions for this to use the STORAGE_AWS_IAM_USER_ARN and STORAGE_AWS_EXTERNAL_ID values for the Trusted entities and Conditions. That is:
- Set Trusted entities to the user ARN found in the
STORAGE_AWS_IAM_USER_ARNvalue - Set a Condition of StringEquals, Key of sts:ExternalId and a Value pointing to the value of
STORAGE_AWS_EXTERNAL_ID
The Trusted entities policy section should therefore look like this:
"Principal": {
  "AWS": "<STORAGE_AWS_IAM_USER_ARN>"
}
See the Snowflake Documentation for more information regarding the above setup.
Create the Snowflake External Stage
This step assumes you are not using the createEntities flag for your Depot Dataset (which would otherwise automatically create a default Stage pointing to your Depot environment's default data bucket for you).
Create an external Stage under your Database that references the S3 Storage Integration created earlier:
CREATE STAGE "EXAMPLE_DB"."PUBLIC".EXAMPLE_STAGE
STORAGE_INTEGRATION = WS_EXAMPLE_STORAGE_INT
URL = 's3://example-test-data';
Grant ownership and usage on the Stage to your Role:
GRANT OWNERSHIP ON STAGE "EXAMPLE_DB"."PUBLIC".EXAMPLE_STAGE TO ROLE EXAMPLE_ROLE;
GRANT USAGE ON STAGE "EXAMPLE_DB"."PUBLIC".EXAMPLE_STAGE TO ROLE EXAMPLE_ROLE;
If your normal user Snowflake account does not have the Role that you have granted permissions for various objects on above, you may not see these objects, or be able to interact with them in the Snowflake console. Add your Role to your user account to remedy this. Alternatively, you can grant your usual console role, e.g. SYSADMIN access to the objects you have created. E.g. Storage integration, Stage, Database, etc... by granting your new custom Role to the SYSADMIN Role.
Create Warehouse
Snowflake privilege requirement: SYSADMIN
Create a Warehouse to use for your Depot Snowflake Location and grant your Role access to it. Also set this Warehouse as the default for your Depot Snowflake Storage Location user account.
CREATE WAREHOUSE EXAMPLE WITH WAREHOUSE_SIZE = 'XSMALL' WAREHOUSE_TYPE = 'STANDARD' AUTO_SUSPEND = 600 AUTO_RESUME = TRUE MIN_CLUSTER_COUNT = 1 MAX_CLUSTER_COUNT = 2 SCALING_POLICY = 'STANDARD';
GRANT MONITOR, OPERATE, USAGE ON WAREHOUSE EXAMPLE TO ROLE EXAMPLE_ROLE;
ALTER USER EXAMPLEUSER SET DEFAULT_WAREHOUSE = 'EXAMPLE';
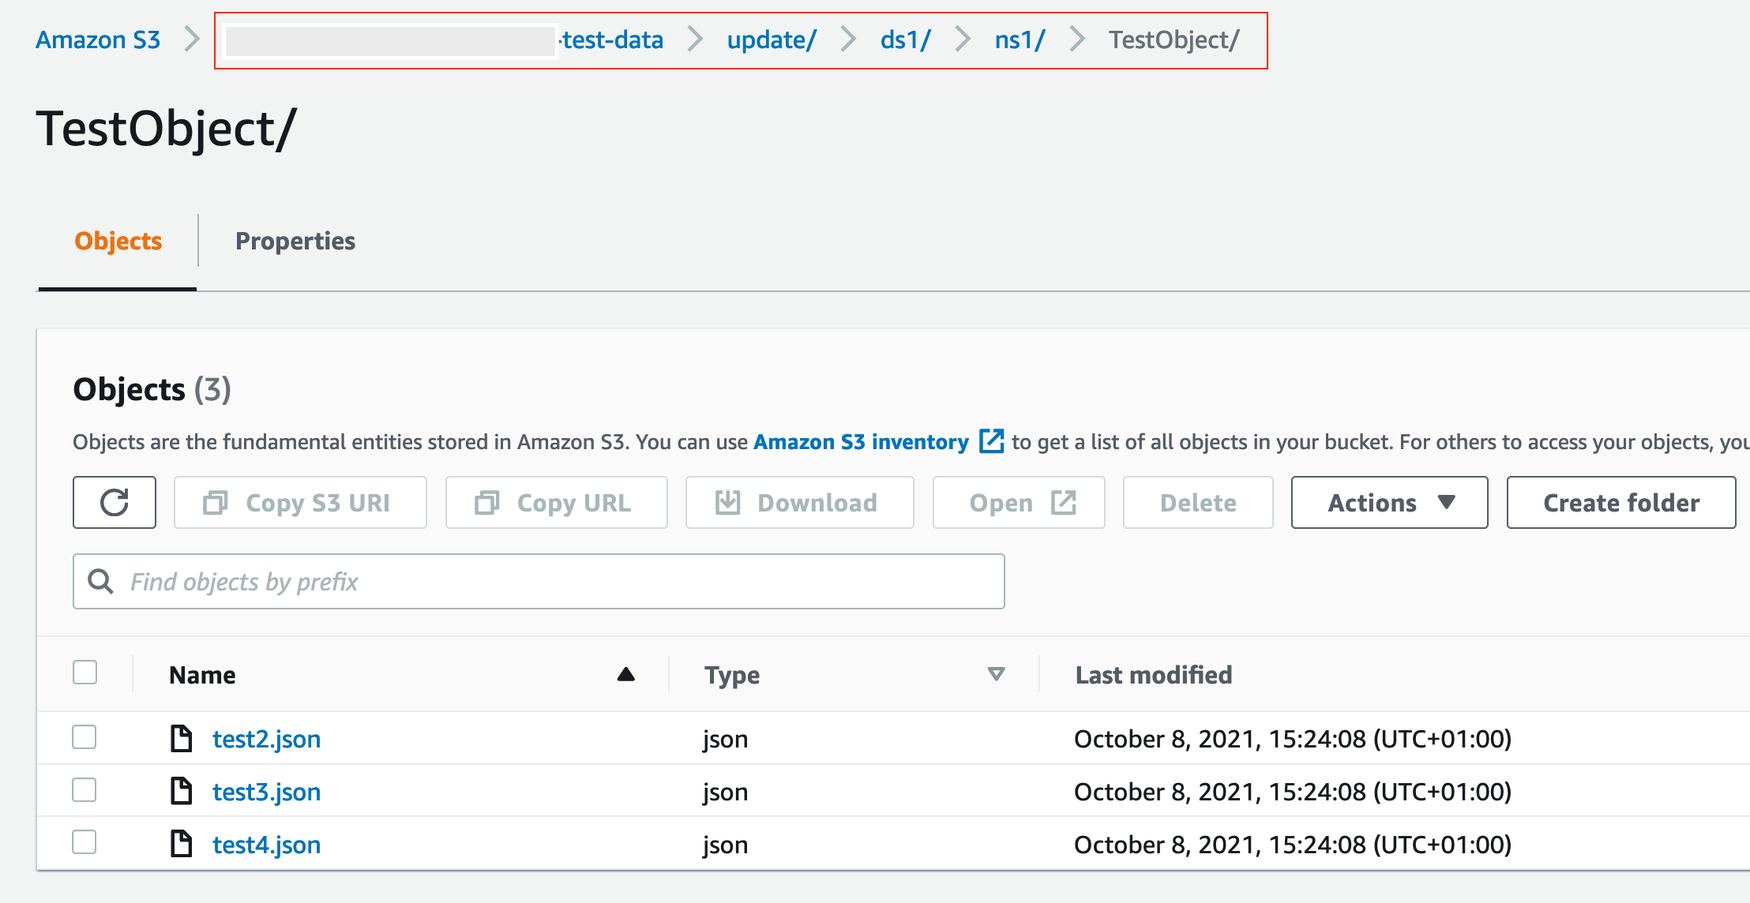
Object / File Placement in S3
This section is informational only. It shows an example of how objects for your Depot schema should be organised into your S3 location.
- Place your input data in a key path that follows your schema name. For dataset
ds1and schemans1.TestObject, your data could be placed as illustrated in the screenshot below: